


Drill Bit Angle Guide: Optimizing Point Angles for Efficient Fastener Installation
Whether you’re drilling a pilot hole for a screw, fabricating parts in a shop, or completing a home renovation project, the right drill bit angle can make all the difference. The angle at the tip of your bit determines how efficiently it cuts, how cleanly it starts, and how long it lasts. Selecting the right point angle improves drilling accuracy, reduces wear on tools, and helps you get smoother, faster results.
In industrial, construction, and DIY applications alike, using the right bit geometry ensures safer, more precise drilling. This guide breaks down the most common drill bit angles, explains how they affect performance, and shows you how to match them to your material for the best outcome.
Why Drill Bit Angles Matter
Choosing a drill bit is about size, material, and geometry. The point angle, which is the tip of the bit where both cutting edges meet, directly affects how the tool interacts with your work surface. A bit with the correct angle cuts efficiently, stays centered, and creates a clean, accurate hole.
How Does the Drill Bit Angle Affect Drilling Performance?
The drill point angle determines how the cutting edges contact the surface. A sharper angle, or smaller degree, cuts aggressively and penetrates quickly, while a flatter angle, or larger degree, spreads the cutting force over a wider area, offering better stability and control.
There are a few points you should know about how the angle impacts drilling:
- Entry and cutting efficiency: A sharper point starts easily but may dull faster. Flatter points are harder to start but offer longer life.
- Accuracy and walking: The point geometry controls “walking,” which is when the bit slips or wanders on the surface before cutting. Proper geometry minimizes this.
- Feed rate and control: The correct angle balances cutting speed and downward pressure, improving hole roundness and preventing chatter.
The Anatomy of the Drill Point
Understanding the basic structure of a drill point helps explain why angle and shape matter.
Key components of a drill point include the following:
- Point angle: This is the included angle at the tip of the bit, typically between 90° and 135°.
- Chisel edge: This is the very tip of the drill where cutting begins. A thinner chisel edge requires less force to start.
- Cutting lips: These are the angled edges that remove material and define the hole’s diameter.
- Split point: This is a feature ground into the tip to create a self-centering action and reduce feed pressure.
A split point design is particularly helpful when drilling hard metals or working on smooth surfaces. It keeps the bit from walking and allows for cleaner starts without a pilot hole. Proper geometry also promotes efficient chip removal and reduces heat buildup, both of which extend tool life.
Comparing Common Drill Point Angles (118° vs. 135°)
Two angles dominate general drilling applications: 118° and 135°. Each serves a different purpose depending on the material and precision needed.
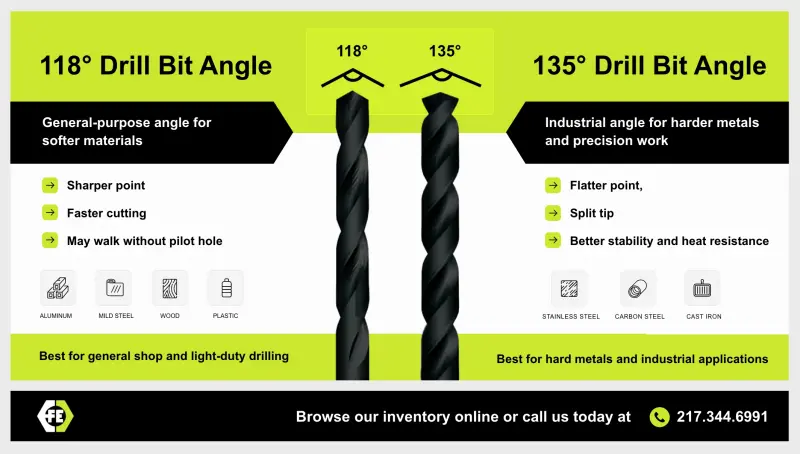
The General-Purpose 118° Angle
An 118-degree angle drill bit is the standard for general-purpose drilling, especially in softer materials. It’s what most twist bit drills come with out of the box, and it works well in:
- Aluminum and other nonferrous metals
- Mild steel
- Wood and soft plastics
However, because it’s sharper, it can walk on the surface when starting a hole. To prevent that, many pros use a center punch or drill press to create a pilot hole before drilling. The 118°-point cuts quickly and easily but can wear faster when used on harder materials. This angle is best for general shop use, woodworking, and light metal fabrication.
The Industrial 135° Angle
The 135-degree angle drill bit is the go-to for hard materials and demanding industrial applications. It’s often found on high-speed steel (HSS) or cobalt bits designed for drilling stainless steel, cast iron, or other hard alloys.
Key characteristics of this angle include:
- Flatter points distribute cutting pressure over a wider area, improving control.
- Split point design eliminates the need for a pilot hole and resists walking.
- Better heat resistance during prolonged drilling protects tools.
However, the trade-off is a slightly slower cutting rate, but that’s a fair exchange for greater accuracy and a longer tool life. The 135°-point is best for precision drilling in stainless steel, carbon steel, cast iron, and high-strength alloys.
Matching Angles to Materials
Not all materials behave the same under a drill. Matching the drill bit angle to your workpiece helps you find the best drill bit to ensure clean holes and efficient cutting.
Best Angles for Metalworking
When working with metal, the bit angle is critical for controlling chip formation and tool temperature. At Fasteners Etc., Inc., we recommend the following:
- 118° bits: Use these bits for soft or nonferrous metals, such as aluminum, copper, and brass. Their sharper point cuts quickly but can dull with prolonged use.
- 135° bits: These are designed for hard metals like stainless steel, carbon steel, and cast iron. The flatter rip resists wear, prevents chatter, and maintains stability.
A good rule of thumb to keep in mind is that the harder the material, the flatter the angle should be. Sharper angles make faster cuts but wear out quickly under high heat. Flatter points distribute the cutting pressure, reduce friction, and improve tool longevity. You can also use a step drill bit to cut effortlessly through metal.
Angles for Wood, Plastics, and Other Materials
Drilling into softer materials like wood or plastic requires a slightly different approach.
- Wood: A 118° or sharper bit works best for wood because it cuts efficiently without tearing fibers. For hardwoods, a flatter point helps control entry and avoid wandering.
- Plastics: Use a 118° or even sharper point to slice cleanly without melting or cracking. A slower speed and lighter feed pressure also help prevent heat buildup.
- Composites: These guidelines are similar to wood, but ensure your bits are sharp and use a controlled speed to avoid delamination.
Matching the bit’s geometry to the material prevents common issues such as splintering in wood, burning in metal, or melting in plastics.
Troubleshooting and Tool Maintenance
Even with the right angle, drill bits can fail early if not maintained or used properly. By understanding how to maintain your bit’s geometry and avoid common errors, you can get the most out of your tool.
Maintaining Drill Bit Angles
Over time, your drill bit’s cutting edges can become dull or worn with repeated use. This can change the angle of your drill bit. A worn or rounded point increases friction and requires more feed force, which can produce even holes.
Proper maintenance can help minimize wear and tear on your drill bit. Tips include:
- Resharpen regularly using a bench grinder or dedicated drill bit sharpener
- Check angles with an angle gauge to ensure accuracy after sharpening
- Use cutting fluid when drilling metal to reduce heat and wear
- Inspect split points, as your bit’s efficiency will drop if they’re uneven or chipped
Keeping your bits sharp and properly angled ensures consistent cutting performance and prolongs their lifespan.
Common Mistakes
Many drilling problems are caused by improper bit geometry or usage. Avoid these common errors:
- Using a dull bit: Dull bits require excessive force and create oversized or rough holes.
- Using the wrong angle for the materials: A 118° bit in hardened steel, for example, may overheat and dull instantly.
- Applying too much feed pressure: Forcing the bit overheats the material and accelerates wear. Let the tool do the work for you.
- Having poor chip clearance: Chips trapped in the flutes cause friction, heat buildup, and even bit breakage. Retract the bit occasionally to clear the excess material.
Maintaining proper angle and technique minimizes downtime and ensures you’re drilling precisely.
Proper Tips for Efficient Drilling
Even with the right bit angle, small technique adjustments can help you drill more efficiently and effectively. They include:
- Use a center punch on metal surfaces to keep the bit from walking.
- Adjust drill speed. Drill slower for tougher materials and metals and faster for soft materials.
- Use lubrication when drilling steel or aluminum to reduce friction.
- Use step drilling. Start with a small pilot hole before moving up to the final size, especially on thicker materials.
- Secure your workpiece with clamps or a vise for stability and safety.
- Choose the right fastener for the project to ensure its safety, stability, and longevity. The wrong fastener can lead to failure and material damage, which can cause you to need to redo your project and put more wear on your drill bits.
By paying attention to these minute details, you can extend your tools’ life and ensure better results.
Find the Right Drill Bits at Fasteners Etc., Inc.
A drill bit’s point angle might seem like a small detail, but it has a major impact on performance and accuracy. The right geometry extends your tool’s life, keeps your bit centered, reduces heat, and improves hole quality, which saves you time and effort overall.
By matching your drill bit angle to your material, you can cut more efficiently and extend the life of your tool. 118° bits are perfect for soft materials like aluminum, wood, and mild steel, while 135° bits are built for tough materials and industrial applications where control and precision matter most.
Whether you’re a contractor, maintenance technician, machinist, or dedicated DIYer, understanding drill point angles helps you make smarter choices and get cleaner, faster results. Need help selecting the right drill bits or fasteners for your next project? The knowledgeable team at Fasteners Etc., Inc. can help you find the best products for your material, application, and needs. Contact us today for expert recommendations or to request a quote.